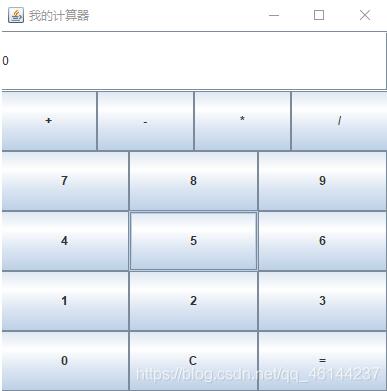
本文实例为大家分享了java awt实现计算器的具体代码,供大家参考,具体内容如下
上课老师演示了一遍他的写法,由于没给代码,因此按着他的思路撸了一遍,感觉还很简单。
代码以及解释如下:
import java.awt.GridLayout;
import java.awt.event.ActionEvent;
import java.awt.event.ActionListener;

import javax.swing.JButton;
import javax.swing.JFrame;
import javax.swing.JPanel;
import javax.swing.JTextField;

public class Caculate1 {
 static String s1=\"\";
 static String s2=\"\";
 static int f=9;
 static int num1=0,num2=0;
 public static void main(String[] args) {
 int x=0,y=0,z=0;
 JFrame jf=new JFrame( \"我的计算器\");
 jf.setBounds(0,0,300,400);
// jf.setBackground(bgColor);
 jf.setVisible(true);
 jf.setDefaultCloseOperation(JFrame.DISPOSE_ON_CLOSE);

 JTextField show=new JTextField(\"0\");
 //此处为布局:也就是定义五个容器,(也可以理解为将定义的JFrame空间分为5个容器)
 JPanel jp1=new JPanel(new GridLayout(1,3));//存储:
 JPanel jp2=new JPanel(new GridLayout(1,3));
 JPanel jp3=new JPanel(new GridLayout(1,3));
 JPanel jp4=new JPanel(new GridLayout(1,3));
 JPanel jp5=new JPanel(new GridLayout(1,3));

 JButton bt_add=new JButton(\"+\");
 JButton bt_sub=new JButton(\"-\");
 JButton bt_mul=new JButton(\"*\");
 JButton bt_div=new JButton(\"/\");
 JButton bt_7=new JButton(\"7\");
 JButton bt_8=new JButton(\"8\");
 JButton bt_9=new JButton(\"9\");
 JButton bt_4=new JButton(\"4\");
 JButton bt_5=new JButton(\"5\");
 JButton bt_6=new JButton(\"6\");
 JButton bt_1=new JButton(\"1\");
 JButton bt_2=new JButton(\"2\");
 JButton bt_3=new JButton(\"3\");
 JButton bt_0=new JButton(\"0\");
 JButton bt_c=new JButton(\"C\");
 JButton bt_equal=new JButton(\"=\");

 jf.setLayout(new GridLayout(6,1));
 //容器1 :添加 \'+\',\'-\',\'*\',\'/\'按钮
 jp1.add(bt_add);
 jp1.add(bt_sub);
 jp1.add(bt_mul);
 jp1.add(bt_div);
 //容器2:添加\'7\',\'8\',\'9\'按钮
 jp2.add(bt_7);
 jp2.add(bt_8);
 jp2.add(bt_9);
 //容器3:添加\'4\',\'5\',\'6\'按钮
 jp3.add(bt_4);
 jp3.add(bt_5);
 jp3.add(bt_6);
 //容器4:添加\'1\',\'2\',\'3\'按钮
 jp4.add(bt_1);
 jp4.add(bt_2);
 jp4.add(bt_3);
 //容器5:添加\'0\',\'C\',\'=\'
 jp5.add(bt_0);
 jp5.add(bt_c);
 jp5.add(bt_equal);

 jf.add(show);
 jf.add(jp1);
 jf.add(jp2);
 jf.add(jp3);
 jf.add(jp4);
 jf.add(jp5);
//元素已经定义好了,思路也很简单:(1)JFrame定义一个大容器jf,jf= 1个显示框(show)+5个容器,分别定义显示框和容器,
 //(2)类似树形添加元素的数据结构,为jf添加元素

 //下面便是时间监听了(又称加载驱动)
 bt_9.addActionListener(new ActionListener(){

  @Override
  public void actionPerformed(ActionEvent e) {

  s1=s1+9;
  show.setText(s1);
  }

 });

 bt_8.addActionListener(new ActionListener(){

  @Override
  public void actionPerformed(ActionEvent e) {

  s1=s1+8;
  show.setText(s1);
  }

 });

 bt_7.addActionListener(new ActionListener(){

  @Override
  public void actionPerformed(ActionEvent e) {

  s1=s1+7;
  show.setText(s1);
  }

 });

 bt_6.addActionListener(new ActionListener(){

  @Override
  public void actionPerformed(ActionEvent e) {

  s1=s1+6;
  show.setText(s1);
  }

 });

 bt_5.addActionListener(new ActionListener(){

  @Override
  public void actionPerformed(ActionEvent e) {

  s1=s1+5;
  show.setText(s1);
  }

 });

 bt_4.addActionListener(new ActionListener(){

  @Override
  public void actionPerformed(ActionEvent e) {

  s1=s1+4;
  show.setText(s1);
  }

 });

 bt_3.addActionListener(new ActionListener(){

  @Override
  public void actionPerformed(ActionEvent e) {

  s1=s1+3;
  show.setText(s1);
  }

 });

 bt_0.addActionListener(new ActionListener(){

  @Override
  public void actionPerformed(ActionEvent e) {

  s1=s1+0;
  show.setText(s1);
  }

 });

 bt_2.addActionListener(new ActionListener(){

  @Override
  public void actionPerformed(ActionEvent e) {

  s1=s1+2;
  show.setText(s1);
  }

 });

 bt_1.addActionListener(new ActionListener(){

  @Override
  public void actionPerformed(ActionEvent e) {

  s1=s1+1;
  show.setText(s1);
  }

 });

 bt_0.addActionListener(new ActionListener(){

  @Override
  public void actionPerformed(ActionEvent e) {

  s1=s1+0;
  show.setText(s1);
  }

 });


 bt_equal.addActionListener(new ActionListener(){

  @Override
  public void actionPerformed(ActionEvent e) {
  num1=Integer.valueOf(s2);
  num2=Integer.valueOf(s1);
  int z=0;
  char fg=\' \';

  switch(f){
  case 0:
   z=num1+num2;
   fg=\'+\';
   break;
  case 1:
   z=num1-num2;
   fg=\'-\';
   break;
  case 2:
   z=num1*num2;
   fg=\'*\';
   break;
  case 3:
   fg=\'/\';
   if(num2==0)
   num2=num2+1;
   z=num1/num2;
   break;
  default:
   break;
  }
  show.setText(s2+\" \"+fg+\" \"+s1+\" = \"+z);
  }

 });
 bt_add.addActionListener(new ActionListener(){

  @Override
  public void actionPerformed(ActionEvent e) {
  s2=s1;
  s1=\"\";
  f=0;
  show.setText(s2+\"+\");
  }

 });
 bt_sub.addActionListener(new ActionListener() {

  @Override
  public void actionPerformed(ActionEvent e) {
  // TODO Auto-generated method stub
  s2 = s1;
  s1 = \"\";
  f = 1;
  show.setText(s2 + \" - \");
  }
 });
 bt_mul.addActionListener(new ActionListener() {

  @Override
  public void actionPerformed(ActionEvent e) {
  // TODO Auto-generated method stub
  s2 = s1;
  s1 = \"\";
  f = 2;
  show.setText(s2 + \" * \");
  }
 });
 bt_div.addActionListener(new ActionListener() {

  @Override
  public void actionPerformed(ActionEvent e) {
  // TODO Auto-generated method stub
  s2 = s1;
  s1 = \"\";
  f = 3;
  show.setText(s2 + \" / \");
  }
 });
 bt_c.addActionListener(new ActionListener() {

  @Override
  public void actionPerformed(ActionEvent e) {
  // TODO Auto-generated method stub
  s2 = \"\";
  s1 = \"\";
  num1 = 0;
  num2 = 0;
  f = 9;
  show.setText(\"0\");
  }
 });
 }

}
关于计算器的精彩文章请查看《计算器专题》 ,更多精彩等你来发现!
以上就是本文的全部内容,希望对大家的学习有所帮助,也希望大家多多支持自学编程网。