简单概述
在日常生活中,我们经常会突发一些奇思妙想,或是一个画面,或是几个符号。这时候无法使用拍照或者打字功能实现,想拿笔记下又身边找不到笔。于是我琢磨能不能做一个手机端的画板。
效果图

实现过程
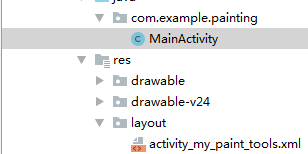
项目布局很简单
让我们来看代码:首先声明画笔,画板,和坐标
public class MainActivity extends AppCompatActivity{

 Paint paint;
 Canvas canvas;
 ImageView imageview;
 Bitmap bitmap,newbitmap;
 TextView tv_stroke;
 int startX, startY, endX, endY;
 @Override
 protected void onCreate(Bundle savedInstanceState) {
  super.onCreate(savedInstanceState);
  setContentView(R.layout.activity_my_paint_tools);
  LinearLayout ll_layout = findViewById(R.id.ll_layout);
  RadioGroup rg_color = findViewById(R.id.rg_color);
遍历单选按钮,当单选按钮选中时,获取单选按钮颜色并将画笔颜色设置当前按钮的文本颜色,最后注意要设置画笔宽度,以免在后面点橡皮擦的时候画笔宽度调不回来
for (int i = 0;i<rg_color.getChildCount();i++){
   RadioButton rb = (RadioButton) rg_color.getChildAt(i);
   rb.setOnCheckedChangeListener(new CompoundButton.OnCheckedChangeListener() {
    @Override
    public void onCheckedChanged(CompoundButton buttonView, boolean isChecked) {
     if (buttonView.isChecked()){
      paint.setColor(buttonView.getTextColors().getDefaultColor());
      paint.setStrokeWidth(5);
     }
    }
   });
  }
首先创建一张空白图片和一张灰色画布,将图片放在画布上面
注册触摸监听事件,获取鼠标按下时的坐标和鼠标移动后的坐标。在开始和结束之间画一条直线并更新画布图片
 imageview.setOnTouchListener(new View.OnTouchListener() {
   @Override
   public boolean onTouch(View v, MotionEvent event) {
    switch(event.getAction()){
     case MotionEvent.ACTION_DOWN:
      Log.i(\"MyPaintToolsActivity\",\"ACTION_DOWN\");


      startX = (int) (event.getX()/1.4);
      startY = (int) (event.getY()/1.4);
      break;
     case MotionEvent.ACTION_MOVE:
      Log.i(\"MyPaintToolsActivity\",\"ACTION_MOVE\");


      endX = (int) (event.getX()/1.4);
      endY = (int) (event.getY()/1.4);

      canvas.drawLine(startX,startY,endX,endY,paint);
      startX = (int) (event.getX()/1.4);
      startY = (int) (event.getY()/1.4);
      imageview.setImageBitmap(bitmap);
      break;
     case MotionEvent.ACTION_UP:
      Log.i(\"MyPaintToolsActivity\",\"ACTION_UP\");
      break;
    }
    imageview.invalidate();
    return true;
   }
  });
清屏的话就一行代码 ,剩下的是重新生成一块画布
 Button btn_clear = findViewById(R.id.btn_clear);
  btn_clear.setOnClickListener(new View.OnClickListener() {
   @Override
   public void onClick(View v) {
    canvas.drawColor(0,PorterDuff.Mode.CLEAR);
    bitmap = Bitmap.createBitmap(888,1200,Bitmap.Config.ARGB_8888);
    canvas = new Canvas(bitmap);
    canvas.drawColor(Color.argb(100,0,0,0));
    paint = new Paint();
    paint.setStrokeWidth(5);
    paint.setAntiAlias(true);
    paint.setColor(Color.RED);
    canvas.drawBitmap(bitmap,new Matrix(),paint);
    imageview.setImageBitmap(bitmap);

   }
  });
呃,这里会把画布擦掉…也就是擦成白色…
最后看看页面布局
<?xml version=\"1.0\" encoding=\"utf-8\"?>
<LinearLayout xmlns:android=\"http://schemas.android.com/apk/res/android\"
 xmlns:app=\"http://schemas.android.com/apk/res-auto\"
 xmlns:tools=\"http://schemas.android.com/tools\"
 android:layout_width=\"match_parent\"
 android:layout_height=\"match_parent\"
 android:orientation=\"vertical\"
 android:id=\"@+id/ll_layout\">
<!-- tools:context=\".MyPaintToolsActivity\">-->

 <ImageView

  android:id=\"@+id/imageview\"
  android:layout_width=\"match_parent\"
  android:layout_height=\"match_parent\"
  android:layout_weight=\"1\" />
 <RadioGroup
  android:background=\"#747373\"
  android:layout_width=\"match_parent\"
  android:orientation=\"horizontal\"
  android:id=\"@+id/rg_color\"
  android:layout_height=\"wrap_content\">

  <RadioButton
   android:id=\"@+id/rb_red\"
   android:layout_width=\"wrap_content\"
   android:layout_height=\"43dp\"
   android:layout_weight=\"1\"
   android:text=\"红色\"
   android:textColor=\"#FF0000\"
   android:textSize=\"18sp\" />

  <RadioButton
   android:id=\"@+id/rb_green\"
   android:layout_width=\"wrap_content\"
   android:layout_height=\"30dp\"
   android:layout_weight=\"1\"
   android:text=\"黑色\"
   android:textColor=\"#000000\"
   android:textSize=\"18sp\" />

  <RadioButton
   android:id=\"@+id/rb_blue\"
   android:layout_width=\"wrap_content\"
   android:layout_height=\"30dp\"
   android:layout_weight=\"1\"
   android:text=\"白色\"
   android:textColor=\"#FFFFFF\"
   android:textSize=\"18sp\" />

 </RadioGroup>
 <LinearLayout
  android:layout_width=\"match_parent\"
  android:layout_height=\"wrap_content\"
  android:gravity=\"center\"
  android:orientation=\"horizontal\">
  <Button
   android:id=\"@+id/btn_clear\"
   android:layout_width=\"wrap_content\"
   android:layout_weight=\"1\"
   android:layout_height=\"wrap_content\"
   android:background=\"#000000\"
   android:textColor=\"#FFFFFF\"
   android:textSize=\"18sp\"
   android:text=\"清除\"/>
  <Button
   android:id=\"@+id/btn_eraser\"
   android:layout_width=\"wrap_content\"
   android:layout_weight=\"1\"
   android:layout_height=\"wrap_content\"
   android:textColor=\"#FFFFFF\"
   android:textSize=\"18sp\"
   android:background=\"#000000\"
   android:text=\"擦除\"/>

 </LinearLayout>

</LinearLayout>
到此这篇关于Android studio实现画板功能的文章就介绍到这了,更多相关Android studio画板功能内容请搜索自学编程网以前的文章或继续浏览下面的相关文章希望大家以后多多支持自学编程网!