本文实例为大家分享了Android实现验证码登录的具体代码,供大家参考,具体内容如下
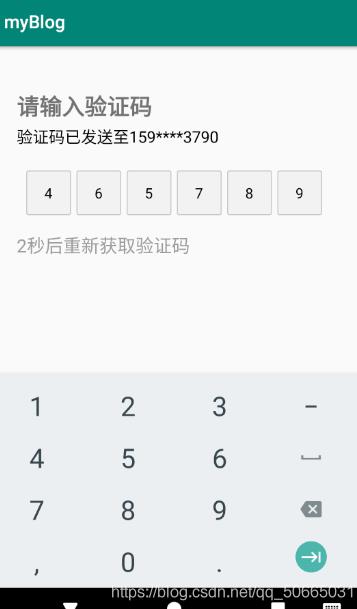
结果展示
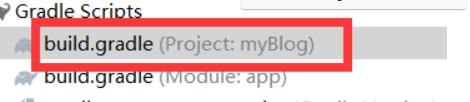
1.导包
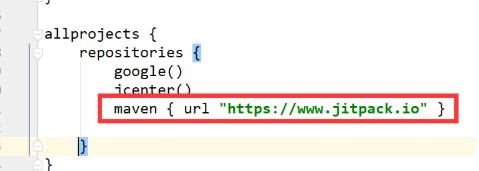
1.1在项目的gradle中导入
maven { url \"https://www.jitpack.io\" }
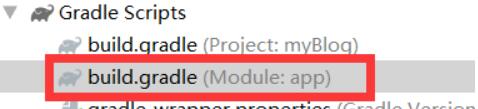
1.2在model的gradle的dependencies导入
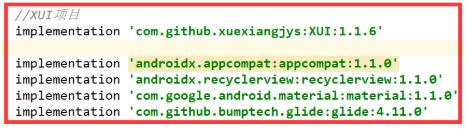
//XUI项目
implementation \'com.github.xuexiangjys:XUI:1.1.6\'

implementation \'androidx.appcompat:appcompat:1.1.0\'
implementation \'androidx.recyclerview:recyclerview:1.1.0\'
implementation \'com.google.android.material:material:1.1.0\'
implementation \'com.github.bumptech.glide:glide:4.11.0\'
1.3点击右上角的sync now
2.新建xml文件
phone_code.xml
<?xml version=\"1.0\" encoding=\"utf-8\"?>
<LinearLayout xmlns:android=\"http://schemas.android.com/apk/res/android\"
 android:layout_width=\"match_parent\"
 android:layout_height=\"match_parent\"
 android:orientation=\"vertical\"
 xmlns:app=\"http://schemas.android.com/apk/res-auto\">


 <TextView
 android:layout_width=\"wrap_content\"
 android:layout_height=\"wrap_content\"
 android:layout_marginLeft=\"30dp\"
 android:layout_marginTop=\"50dp\"
 android:textSize=\"25dp\"
 android:textStyle=\"bold\"
 android:text=\"请输入验证码\"
 />
 <TextView
 android:id=\"@+id/phone_number_str\"
 android:layout_width=\"wrap_content\"
 android:layout_height=\"wrap_content\"
 android:textSize=\"18dp\"
 android:textColor=\"#000000\"
 android:layout_marginLeft=\"30dp\"
 android:layout_marginTop=\"5dp\"
 />

 <com.xuexiang.xui.widget.edittext.verify.VerifyCodeEditText
 android:id=\"@+id/phone_code_input\"
 android:layout_width=\"match_parent\"
 android:layout_height=\"wrap_content\"
 android:layout_marginLeft=\"10dp\"
 android:layout_marginTop=\"26dp\"
 android:layout_marginRight=\"10dp\"
 app:vcet_is_pwd=\"false\"
 app:vcet_number=\"6\"
 app:vcet_pwd_radius=\"10dp\"
 app:vcet_text_color=\"#000000\"
 app:vcet_width=\"50dp\" />

 <TextView
 android:id=\"@+id/re_get_code\"
 android:layout_width=\"wrap_content\"
 android:layout_height=\"wrap_content\"
 android:layout_marginTop=\"20dp\"
 android:layout_marginLeft=\"30dp\"
 android:textColor=\"#60000000\"
 android:textSize=\"20dp\"
 />

 <TextView
 android:id=\"@+id/get_code\"
 android:layout_width=\"wrap_content\"
 android:layout_height=\"wrap_content\"
 android:layout_marginTop=\"20dp\"
 android:layout_marginLeft=\"30dp\"
 android:textColor=\"#60000000\"
 android:textSize=\"15dp\"
 />

</LinearLayout>
3.修改Activity
MainActivity.java
import androidx.appcompat.app.AppCompatActivity;

import android.os.Bundle;
import android.content.Intent;
import android.view.View;
import android.widget.TextView;

import androidx.annotation.Nullable;


import java.lang.reflect.Field;
import java.util.Timer;
import java.util.TimerTask;

public class MainActivity extends AppCompatActivity implements View.OnClickListener {
 TextView phoneNumberStr;
 TextView codeCountDown;
 TextView reGetCode;
 private int recLen = 10;

 Timer timer = new Timer();
 @Override
 protected void onCreate(@Nullable Bundle savedInstanceState) {
 super.onCreate(savedInstanceState);
 setContentView(R.layout.phone_code);
 init();//初始化组件
 String phone = new String(\"15968373790\");

 if (phone.length() < 11)
  phoneNumberStr.setText(\"验证码已发送至\"+phone);
 else
  phoneNumberStr.setText(\"验证码已发送至\"+phone.substring(0,3)+\"****\"+phone.substring(7));
 timer.schedule(task, 1000, 1000); // 启动一个1000毫秒(1秒)的定时任务

 }

 TimerTask task = new TimerTask() {
 @Override
 public void run() {

  runOnUiThread(new Runnable() {
  @Override
  public void run() {
   codeCountDown.setVisibility(View.VISIBLE);
   recLen--;
   codeCountDown.setText(recLen+\"秒后重新获取验证码\");//动态调整秒数下降
   if(recLen <= 0){
   timer.cancel();
   codeCountDown.setVisibility(View.GONE);
   reGetCode.setText(\"重新获得验证码\");//倒计时结束,修改为重新获得验证码

   reGetCode.setVisibility(View.VISIBLE);//修改控件的可见性
   reGetCode.setOnClickListener(new View.OnClickListener() {
    @Override
    public void onClick(View v) {
    reGetCode.setVisibility(View.GONE);
    recLen = 10;
    codeCountDown.setVisibility(View.VISIBLE);
    codeCountDown.setText(recLen+\"秒后重新获取验证码\");
    timer = new Timer();
    //task一般情况下使用过一次后无法再使用,但可以借助反射使得task重新工作,修改state属性即可,state为1时表示已经使用过无法再次使用,为0表示可以使用
    Field field;
    try {
     field = TimerTask.class.getDeclaredField(\"state\");
     field.setAccessible(true);
     field.set(task, 0);
    } catch (NoSuchFieldException e) {
     e.printStackTrace();
    } catch (Exception e) {
     e.printStackTrace();
    }
    timer.schedule(task, 1000, 1000);
    }
   });
   }
  }
  });
 }
 };


 private void init() {

 phoneNumberStr = findViewById(R.id.phone_number_str);
 codeCountDown = findViewById(R.id.re_get_code);
 reGetCode = findViewById(R.id.re_get_code);
 reGetCode.setOnClickListener(this);
 reGetCode.setVisibility(View.GONE);
 }


 @Override
 public void onClick(View v) {
 Intent intent;//设置单击事件使得倒计时可以继续
 switch (v.getId()){
  case R.id.get_code:
  reGetCode.setVisibility(View.GONE);
  timer.schedule(task, 1000, 1000); // timeTask
  break;
 }
 }
}
以上就是本文的全部内容,希望对大家的学习有所帮助,也希望大家多多支持自学编程网。