前言
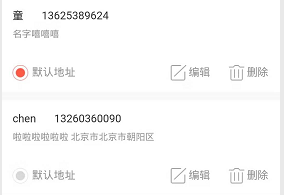
根据项目需要使用 Vue-touch 实现了一个vue移动端的左滑编辑和删除功能,废话不多说,先看效果图,然后上代码吧!

方法如下:
第一步:安装 vue-touch
npm install vue-touch@next --save
第二步:main.js 中引入
import VueTouch from \'vue-touch\';
Vue.use(VueTouch, {
  name: \'v-touch\'
});
第三步:使用(用v-touch包住你要左滑删除的内容)
<div class=\"wrap\">
      <v-touch
        style=\"margin-bottom:10px\"
        v-on:panstart=\"onPanStart(key)\"
        v-on:panmove=\"onPanMove\"
        v-on:panend=\"onPanEnd\"
        v-for=\"(item, key) in list\"
        :key=\"key\"
      >
  <!-- 下面div这一块是我页面需要左滑删除的项目内容,你可以替换成你自己的 -->
        <div class=\"item df_sb item-p\" :style=\"activeId === key ? swipe : \'\'\">
          <p class=\"left-img\">
            <img :src=\"item.image_url\" alt>
          </p>
          <p class=\"url\" v-if=\"item.redirect_url != \'\' \">{{item.redirect_url}}</p>
          <p class=\"city nothave\" v-else>无</p>
          <p class=\"city\">{{item.city}}</p>
          <div class=\"edit-delete df_sad\" :ref=\"\'editBtn\' + key\">
            <div class=\"edit\" @click=\"editFun(\'edit\',item.id,item.image_url,item.redirect_url)\">
              <img src=\"../../assets/images/adver/ic_xiugai.png\" alt>
            </div>
            <p class=\"edit-line\"></p>
            <div class=\"ad-delete\" @click=\"deleteFun(key,item.id)\">
              <img src=\"../../assets/images/adver/ic_shanchu.png\" alt>
            </div>
          </div>
        </div>
      </v-touch>
    </div>
第四步:定义变量,以及方法,下面代码可直接拷贝,将不需要的删除换成自己的,需要的留着就行
<script>
import httpApi from \"../../http/httpApi\";
export default {
  name: \"\",
  data() {
    return {
      swipe: \"\", // 滑动的样式
      wd: 0, // 编辑和删除按钮的宽度之和
      swipeWd: 0, // 已经滑动的距离
      activeId: \"\", // 实际是上一次的活动id
    //以上四个变量必须保留,下面的三个可以删除
      page: 1,
      size: 10,
      list: []
    };
  },
  methods: {
//请求列表数据
    getList($state) {
      let params = new URLSearchParams();
      params.append(\"page\", this.page);
      params.append(\"size\", this.size);
      this.$post(httpApi.BANNERLIST, params)
        .then(res => {
          if (res.code == 10000) {
            if (res.data) {
              this.list = this.list.concat(res.data.list);
              this.page++;
              if (res.data.list.length === 10) {
                $state.loaded();
              } else {
                $state.complete();
              }
            } else {
              $state.complete();
            }
          } else {
            $state.complete();
          }
        })
        .catch(err => {
          console.log(err);
        });
    },
    // 编辑
    editFun(type, image_id, image, url) {
      this.$router.push({
        path: \"/issueAdvertising\",
      });
    },
    // 删除
    deleteFun(index, image_id) {
      this.activeId = \"\"; //将上一次的活动id制空
      let params = new URLSearchParams();
      params.append(\"agent_id\", this.id);
      params.append(\"image_id\", image_id);
      this.$post(httpApi.DELETEBANNER, params)
        .then(res => {
          if (res.code == 10000) {
// 虽然请求删除接口删除了列表其中的某一项内容,但是页面上还有
//因此需要在本地数组中也删除,这样才完美,下面这行代码比较重要,可以写在你删除接口成功后的地方
            this.list.splice(index, 1);
            this.modal.toastFun(\"删除成功\");
          } else if (res.code == 20000) {
            this.modal.toastFun(res.message);
          }
        })
        .catch(err => {});
    },

// 以下三个方法全部拷贝,无需修改
//滑动位置
    onPanStart(id) {
      event.preventDefault();
      // 获取右侧按钮宽度
      let str = \"editBtn\" + id;
      this.wd = 1.2 * this.$refs[str][0].offsetWidth;
      // 初始化
      if (this.activeId != id) {
        this.swipe = \"transform:translateX(0px)\";
        this.swipeWd = 0;
      }
      this.activeId = id;
    },
//滑动位置
    onPanMove(event) {
      event.preventDefault();
      let deltaX = event.deltaX;
      // 组件向左移动直到最大距离
      if (deltaX < 0 && deltaX > -this.wd) {
        // 向左滑动
        this.swipe = \"transform:translateX(\" + deltaX + \"px)\";
        this.swipeWd = deltaX;
      }

      if (deltaX > 0 && deltaX <= this.wd && this.swipeWd < 0) {
        // 向右滑动
        let wx = deltaX + this.swipeWd;
        this.swipe = \"transform:translateX(\" + wx + \"px)\";
      }
    },
 // 结束位置
    onPanEnd(event) {
      event.preventDefault();
      // 判断向左移动的距离是否大于二分之一
      let deltaX = event.deltaX;
      if (deltaX < 0) {
        if (deltaX <= -this.wd / 2) {
          // 向左滑动超过二分之一
          this.swipe = \"transform:translateX(\" + -this.wd + \"px)\";
          this.swipeWd = -this.wd;
        } else {
          this.swipe = \"transform:translateX(0px)\";
          this.swipeWd = 0;
        }
      } else {
        if (this.swipeWd < 0 && deltaX >= this.wd / 2) {
          // 向左滑动超过二分之一
          this.swipe = \"transform:translateX(0px)\";
          this.swipeWd = 0;
        } else {
          this.swipe = \"transform:translateX(\" + this.swipeWd + \"px)\";
        }
      }
    }
  },

};
</script>
style
我只贴出了上面代码的css样式,根据需求自行删减吧,有需要的留着,不需要的删除,需要改变的自行修改
.wrap {
  width: 100%;
  height: 100%;
  overflow: hidden;
}
.item {
  padding-left: 40px;
  height: 120px;
  background: #ffffff;
  align-items: center;
  flex-direction: inherit;
  .left-img {
    width: 120px;
    height: 100px;
    overflow: hidden;
    img {
      min-width: 120px;
      height: 100px;
    }
  }
}
.url {
  width: 400px;
  padding: 10px 30px 0;
  box-sizing: border-box;
  word-wrap: break-word;
  text-align: center;
  overflow: hidden;
  text-overflow: ellipsis;
  white-space: nowrap;
}
.city {
  text-align: center;
  min-width: 100px;
}
.item-p {
  color: #333333;
  font-size: 22px;
}
.nothave {
  color: #999999;
}
.hint {
  height: 40px;
  align-items: center;
  margin-bottom: 30px;
}
.line {
  width: 250px;
  height: 1px;
  background: #999999;
  opacity: 0.5;
}
.item {
  width: 120%; // 超过100%
  transition: 0.1s ease 0s; // 过渡效果
}
.edit-line {
  width: 2px;
  height: 80px;
  background: rgba(255, 255, 255, 1);
}
.edit-delete {
  width: 160px;
  height: 100%;
  background: rgba(255, 126, 34, 1);
  opacity: 0.8;
  align-items: center;
}
.edit,
.ad-delete {
  img {
    width: 42px;
    height: 42px;
  }
}
.add-btn {
  width: 200px;
  height: 80px;
  background: rgba(255, 126, 34, 1);
  box-shadow: 0px 0px 5px 0px rgba(221, 221, 236, 1);
  border-radius: 40px;
  text-align: center;
  line-height: 80px;
  color: #ffffff;
  font-size: 30px;
  position: fixed;
  bottom: 8%;
  left: 50%;
  transform: translateX(-50%);
}
总结
有需要的拿走根据自己的需求稍做修改即可,写的很详细,到此这篇关于vue移动端实现左滑编辑与删除的全过程的文章就介绍到这了,更多相关vue左滑编辑与删除内容请搜索以前的文章或继续浏览下面的相关文章希望大家以后多多支持!
© 版权声明
THE END


暂无评论内容