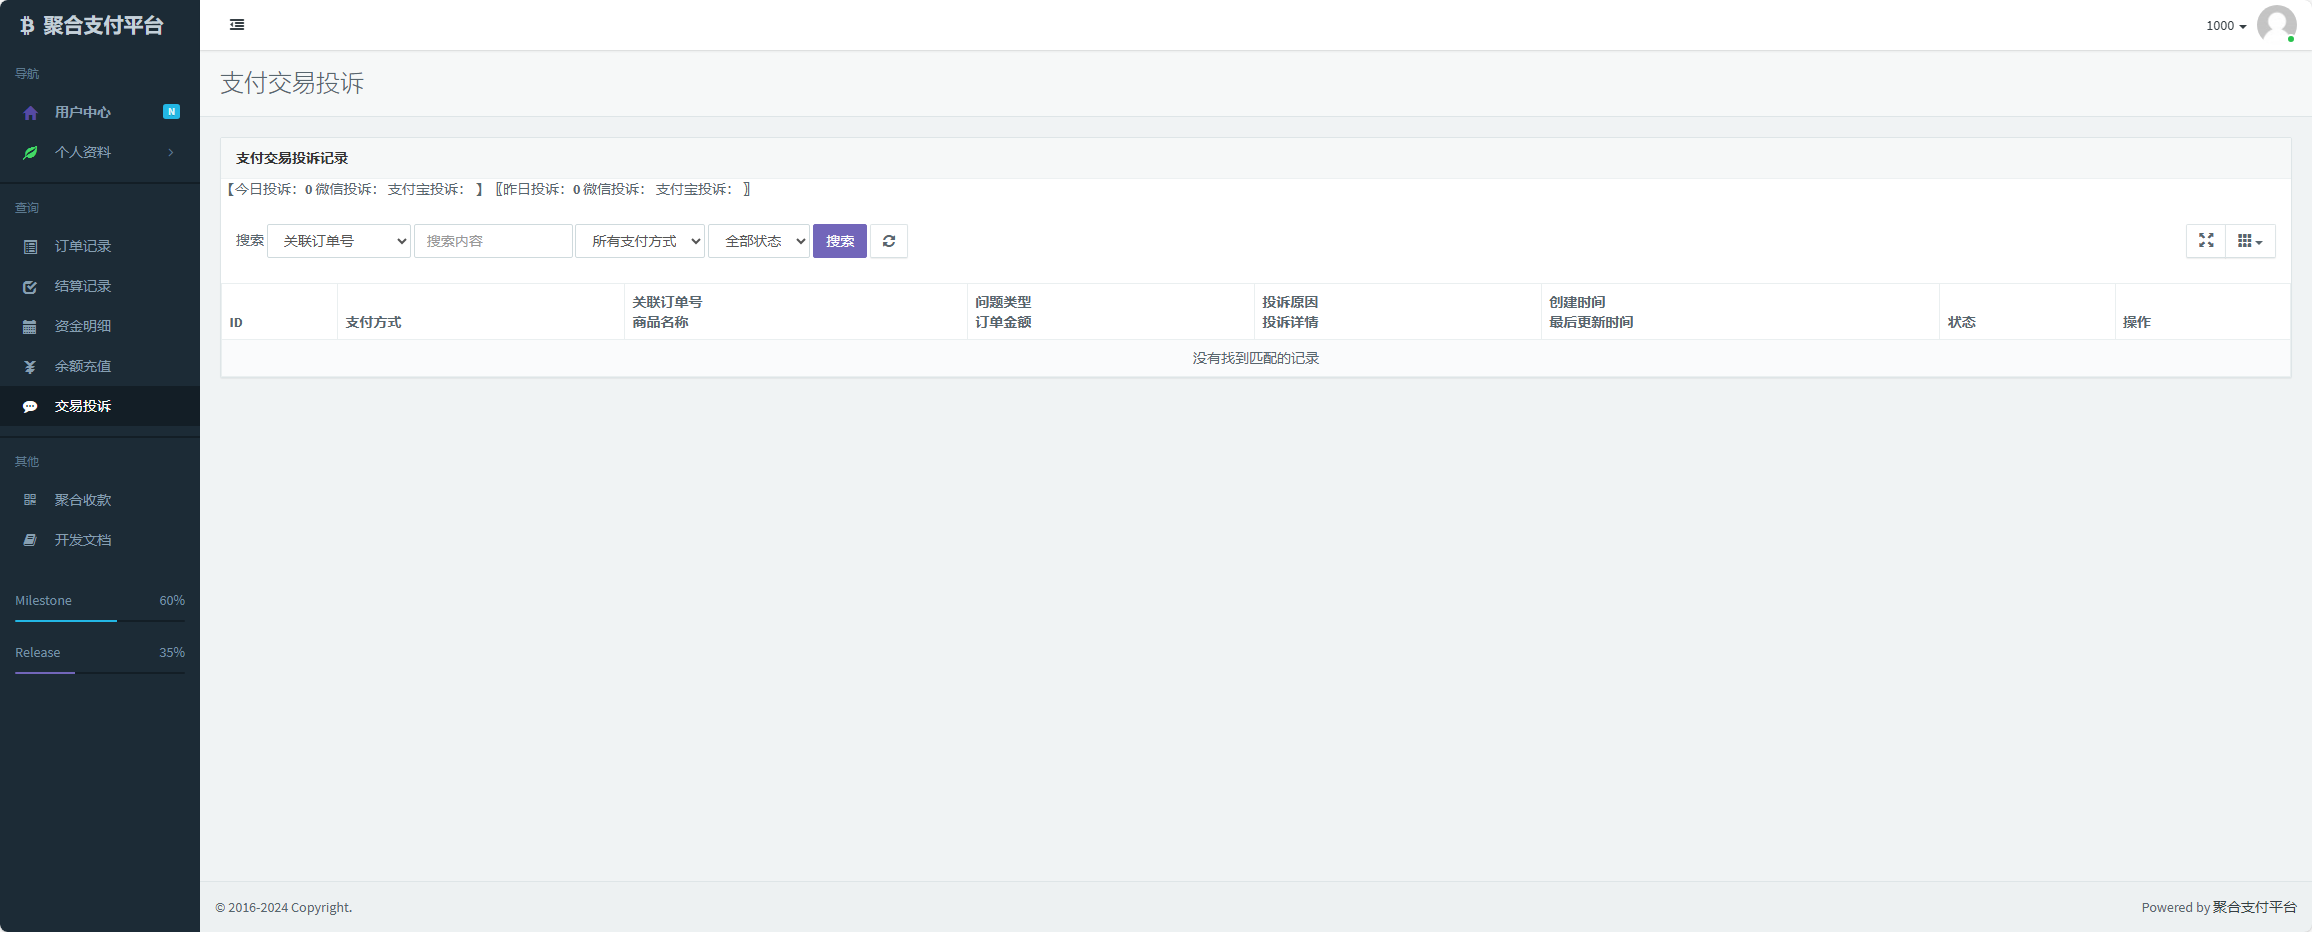
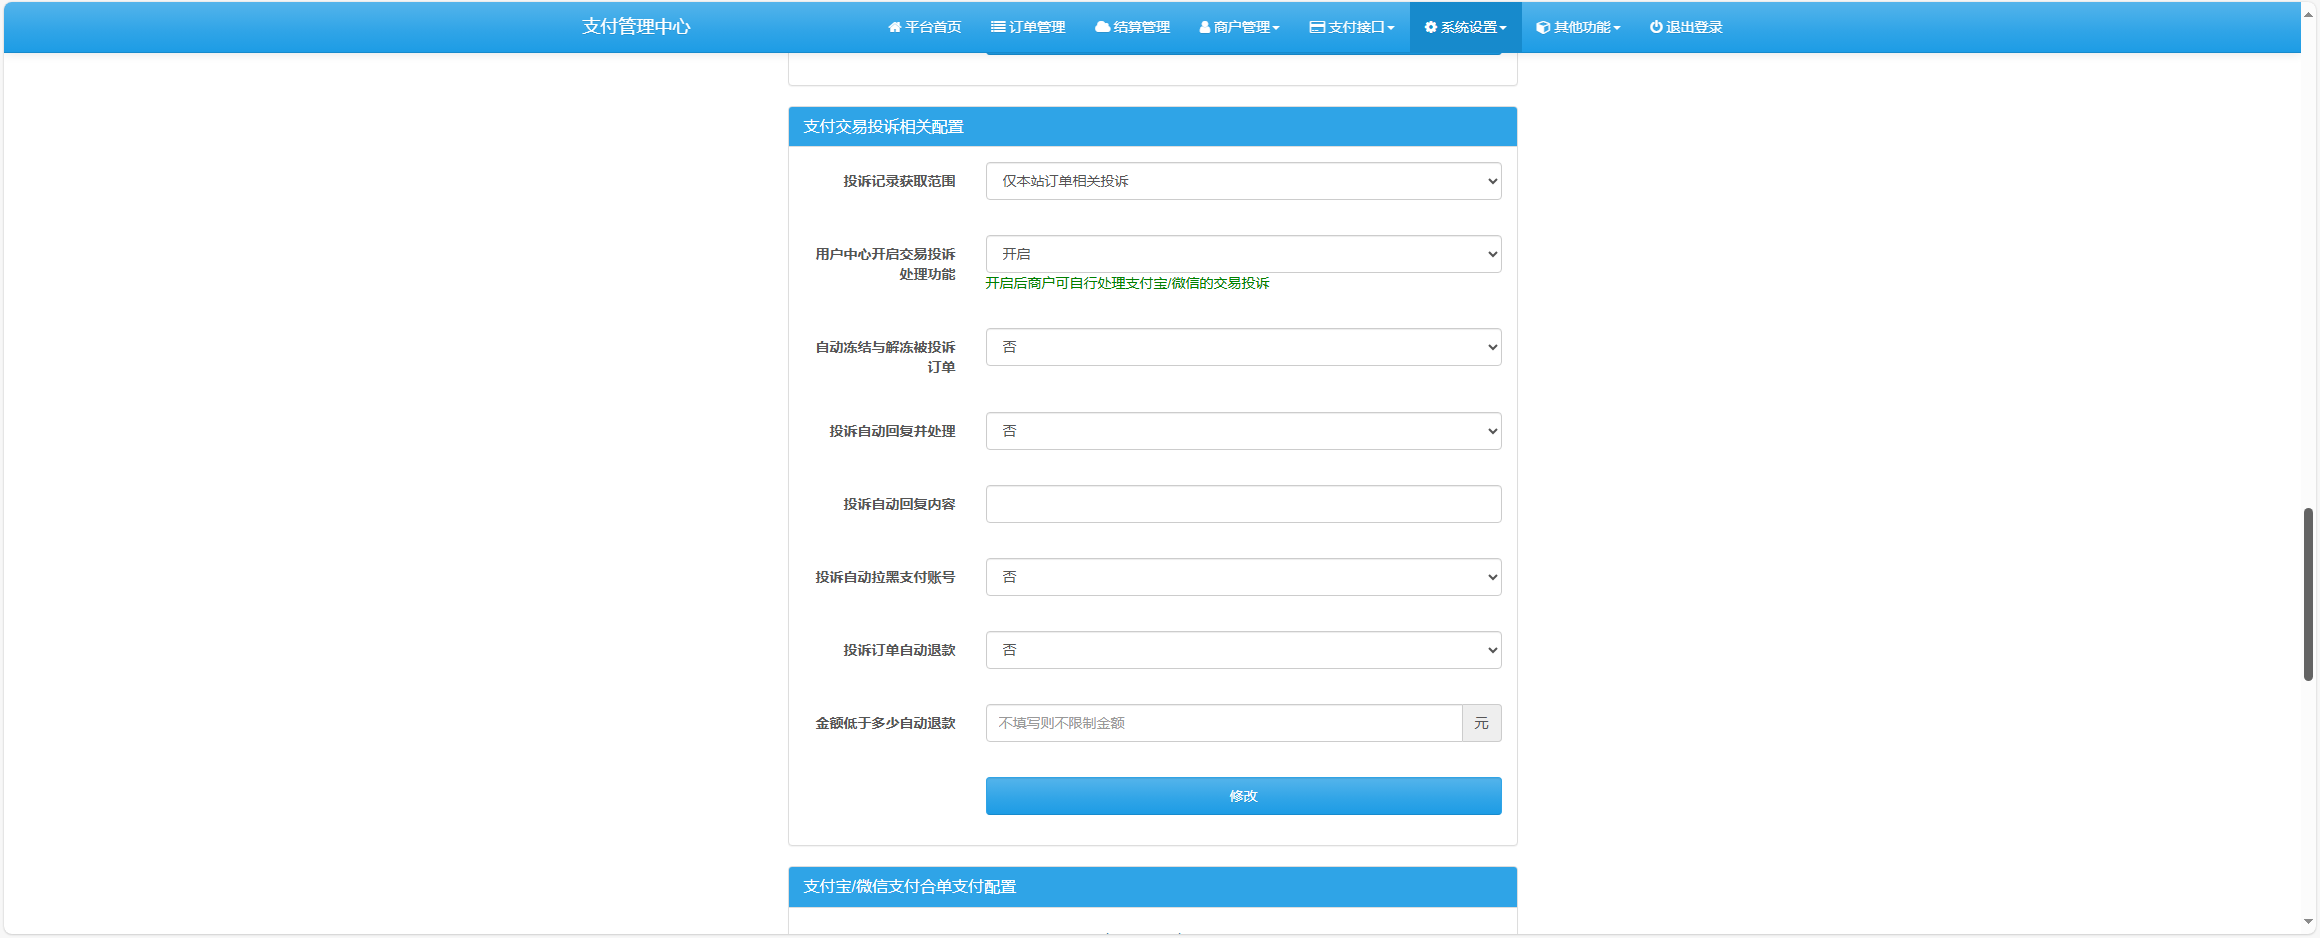
Python CGI编程
什么是CGI
CGI 目前由NCSA维护,NCSA定义CGI如下:
CGI(Common Gateway Interface),通用网关接口,它是一段程序,运行在服务器上如:HTTP服务器,提供同客户端HTML页面的接口。
网页浏览
为了更好的了解CGI是如何工作的,我们可以从在网页上点击一个链接或URL的流程:
- 1、使用你的浏览器访问URL并连接到HTTP web 服务器。
- 2、Web服务器接收到请求信息后会解析URL,并查找访问的文件在服务器上是否存在,如果存在返回文件的内容,否则返回错误信息。
- 3、浏览器从服务器上接收信息,并显示接收的文件或者错误信息。
CGI程序可以是Python脚本,PERL脚本,SHELL脚本,C或者C++程序等。
CGI架构图
Web服务器支持及配置
在你进行CGI编程前,确保您的Web服务器支持CGI及已经配置了CGI的处理程序。
Apache 支持CGI 配置:
设置好CGI目录:
ScriptAlias /cgi-bin/ /var/www/cgi-bin/
所有的HTTP服务器执行CGI程序都保存在一个预先配置的目录。这个目录被称为CGI目录,并按照惯例,它被命名为/var/www/cgi-bin目录。
CGI文件的扩展名为.cgi,python也可以使用.py扩展名。
默认情况下,Linux服务器配置运行的cgi-bin目录中为/var/www。
如果你想指定其他运行CGI脚本的目录,可以修改httpd.conf配置文件,如下所示:
<Directory \"/var/www/cgi-bin\"> AllowOverride None Options FollowSymLinks +ExecCGI Order allow,deny Allow from all </Directory>
在 AddHandler 中添加 .py 后缀,这样我们就可以访问 .py 结尾的 python 脚本文件:
AddHandler cgi-script .cgi .pl .py
第一个CGI程序
我们使用Python创建第一个CGI程序,文件名为hellp.py,文件位于/var/www/cgi-bin目录中,内容如下,修改文件的权限为755:
#!/usr/bin/python # -*- coding: UTF-8 -*- print \"Content-type:text/html\\r\\n\\r\\n\" print \'<html>\' print \'<head>\' print \'<title>Hello Word - First CGI Program</title>\' print \'</head>\' print \'<body>\' print \'<h2>Hello Word! This is my first CGI program</h2>\' print \'</body>\' print \'</html>\'
以上程序在浏览器访问显示结果如下:
Hello Word! This is my first CGI program
这个的hello.py脚本是一个简单的Python脚本,脚本第一行的输出内容\”Content-type:text/html\\r\\n\\r\\n\”发送到浏览器并告知浏览器显示的内容类型为\”text/html\”。
HTTP头部
hello.py文件内容中的\” Content-type:text/html\\r\\n\\r\\n\”即为HTTP头部的一部分,它会发送给浏览器告诉浏览器文件的内容类型。
HTTP头部的格式如下:
HTTP 字段名: 字段内容 例如 Content-type: text/html\\r\\n\\r\\n
以下表格介绍了CGI程序中HTTP头部经常使用的信息:
头 | 描述 |
---|---|
Content-type: | 请求的与实体对应的MIME信息。例如: Content-type:text/html |
Expires: Date | 响应过期的日期和时间 |
Location: URL | 用来重定向接收方到非请求URL的位置来完成请求或标识新的资源 |
Last-modified: Date | 请求资源的最后修改时间 |
Content-length: N | 请求的内容长度 |
Set-Cookie: String | 设置Http Cookie |
CGI环境变量
所有的CGI程序都接收以下的环境变量,这些变量在CGI程序中发挥了重要的作用:
变量名 | 描述 |
---|---|
CONTENT_TYPE | 这个环境变量的值指示所传递来的信息的MIME类型。目前,环境变量CONTENT_TYPE一般都是:application/x-www-form-urlencoded,他表示数据来自于HTML表单。 |
CONTENT_LENGTH | 如果服务器与CGI程序信息的传递方式是POST,这个环境变量即使从标准输入STDIN中可以读到的有效数据的字节数。这个环境变量在读取所输入的数据时必须使用。 |
HTTP_COOKIE | 客户机内的 COOKIE 内容。 |
HTTP_USER_AGENT | 提供包含了版本数或其他专有数据的客户浏览器信息。 |
PATH_INFO | 这个环境变量的值表示紧接在CGI程序名之后的其他路径信息。它常常作为CGI程序的参数出现。 |
QUERY_STRING | 如果服务器与CGI程序信息的传递方式是GET,这个环境变量的值即使所传递的信息。这个信息经跟在CGI程序名的后面,两者中间用一个问号\’?\’分隔。 |
REMOTE_ADDR | 这个环境变量的值是发送请求的客户机的IP地址,例如上面的192.168.1.67。这个值总是存在的。而且它是Web客户机需要提供给Web服务器的唯一标识,可以在CGI程序中用它来区分不同的Web客户机。 |
REMOTE_HOST | 这个环境变量的值包含发送CGI请求的客户机的主机名。如果不支持你想查询,则无需定义此环境变量。 |
REQUEST_METHOD | 提供脚本被调用的方法。对于使用 HTTP/1.0 协议的脚本,仅 GET 和 POST 有意义。 |
SCRIPT_FILENAME | CGI脚本的完整路径 |
SCRIPT_NAME | CGI脚本的的名称 |
SERVER_NAME | 这是你的 WEB 服务器的主机名、别名或IP地址。 |
SERVER_SOFTWARE | 这个环境变量的值包含了调用CGI程序的HTTP服务器的名称和版本号。例如,上面的值为Apache/2.2.14(Unix) |
以下是一个简单的CGI脚本输出CGI的环境变量:
#!/usr/bin/python # -*- coding: UTF-8 -*- import os print \"Content-type: text/html\\r\\n\\r\\n\"; print \"<font size=+1>Environment</font><\\br>\"; for param in os.environ.keys(): print \"<b>%20s</b>: %s<\\br>\" % (param, os.environ[param])
GET和POST方法
浏览器客户端通过两种方法向服务器传递信息,这两种方法就是 GET 方法和 POST 方法。
使用GET方法传输数据
GET方法发送编码后的用户信息到服务端,数据信息包含在请求页面的URL上,以\”?\”号分割, 如下所示:
http://www.test.com/cgi-bin/hello.py?key1=value1&key2=value2
有关 GET 请求的其他一些注释:
- GET 请求可被缓存
- GET 请求保留在浏览器历史记录中
- GET 请求可被收藏为书签
- GET 请求不应在处理敏感数据时使用
- GET 请求有长度限制
- GET 请求只应当用于取回数据
简单的url实例:GET方法
以下是一个简单的URL,使用GET方法向hello_get.py程序发送两个参数:
/cgi-bin/hello_get.py?first_name=ZARA&last_name=ALI
以下为hello_get.py文件的代码:
#!/usr/bin/python # -*- coding: UTF-8 -*- # CGI处理模块 import cgi, cgitb # 创建 FieldStorage 的实例化 form = cgi.FieldStorage() # 获取数据 first_name = form.getvalue(\'first_name\') last_name = form.getvalue(\'last_name\') print \"Content-type:text/html\\r\\n\\r\\n\" print \"<html>\" print \"<head>\" print \"<title>Hello - Second CGI Program</title>\" print \"</head>\" print \"<body>\" print \"<h2>Hello %s %s</h2>\" % (first_name, last_name) print \"</body>\" print \"</html>\"
浏览器请求输出结果:
Hello ZARA ALI
简单的表单实例:GET方法
以下是一个通过HTML的表单使用GET方法向服务器发送两个数据,提交的服务器脚本同样是hello_get.py文件,代码如下:
<form action=\"/cgi-bin/hello_get.py\" method=\"get\"> First Name: <input type=\"text\" name=\"first_name\"> <br /> Last Name: <input type=\"text\" name=\"last_name\" /> <input type=\"submit\" value=\"Submit\" /> </form>
使用POST方法传递数据
使用POST方法向服务器传递数据是更安全可靠的,像一些敏感信息如用户密码等需要使用POST传输数据。
以下同样是hello_get.py ,它也可以处理浏览器提交的POST表单数据:
#!/usr/bin/python # -*- coding: UTF-8 -*- # 引入 CGI 模块 import cgi, cgitb # 创建 FieldStorage 实例 form = cgi.FieldStorage() # 获取表单数据 first_name = form.getvalue(\'first_name\') last_name = form.getvalue(\'last_name\') print \"Content-type:text/html\\r\\n\\r\\n\" print \"<html>\" print \"<head>\" print \"<title>Hello - Second CGI Program</title>\" print \"</head>\" print \"<body>\" print \"<h2>Hello %s %s</h2>\" % (first_name, last_name) print \"</body>\" print \"</html>\"
以下为表单通过POST方法向服务器脚本hello_get.py提交数据:
<form action=\"/cgi-bin/hello_get.py\" method=\"post\"> First Name: <input type=\"text\" name=\"first_name\"><br /> Last Name: <input type=\"text\" name=\"last_name\" /> <input type=\"submit\" value=\"Submit\" /> </form>
通过CGI程序传递checkbox数据
checkbox用于提交一个或者多个选项数据,HTML代码如下:
<form action=\"/cgi-bin/checkbox.cgi\" method=\"POST\" target=\"_blank\"> <input type=\"checkbox\" name=\"maths\" value=\"on\" /> Maths <input type=\"checkbox\" name=\"physics\" value=\"on\" /> Physics <input type=\"submit\" value=\"Select Subject\" /> </form>
以下为 checkbox.cgi 文件的代码:
#!/usr/bin/python # -*- coding: UTF-8 -*- # 引入 CGI 处理模块 import cgi, cgitb # 创建 FieldStorage的实例 form = cgi.FieldStorage() # 接收字段数据 if form.getvalue(\'maths\'): math_flag = \"ON\" else: math_flag = \"OFF\" if form.getvalue(\'physics\'): physics_flag = \"ON\" else: physics_flag = \"OFF\" print \"Content-type:text/html\\r\\n\\r\\n\" print \"<html>\" print \"<head>\" print \"<title>Checkbox - Third CGI Program</title>\" print \"</head>\" print \"<body>\" print \"<h2> CheckBox Maths is : %s</h2>\" % math_flag print \"<h2> CheckBox Physics is : %s</h2>\" % physics_flag print \"</body>\" print \"</html>\"
通过CGI程序传递Radio数据
Radio只向服务器传递一个数据,HTML代码如下:
<form action=\"/cgi-bin/radiobutton.py\" method=\"post\" target=\"_blank\"> <input type=\"radio\" name=\"subject\" value=\"maths\" /> Maths <input type=\"radio\" name=\"subject\" value=\"physics\" /> Physics <input type=\"submit\" value=\"Select Subject\" /> </form>
radiobutton.py 脚本代码如下:
#!/usr/bin/python # -*- coding: UTF-8 -*- # Import modules for CGI handling import cgi, cgitb # Create instance of FieldStorage form = cgi.FieldStorage() # Get data from fields if form.getvalue(\'subject\'): subject = form.getvalue(\'subject\') else: subject = \"Not set\" print \"Content-type:text/html\\r\\n\\r\\n\" print \"<html>\" print \"<head>\" print \"<title>Radio - Fourth CGI Program</title>\" print \"</head>\" print \"<body>\" print \"<h2> Selected Subject is %s</h2>\" % subject print \"</body>\" print \"</html>\"
通过CGI程序传递 Textarea 数据
Textarea向服务器传递多行数据,HTML代码如下:
<form action=\"/cgi-bin/textarea.py\" method=\"post\" target=\"_blank\"> <textarea name=\"textcontent\" cols=\"40\" rows=\"4\"> Type your text here... </textarea> <input type=\"submit\" value=\"Submit\" /> </form>
textarea.cgi脚本代码如下:
#!/usr/bin/python # -*- coding: UTF-8 -*- # Import modules for CGI handling import cgi, cgitb # Create instance of FieldStorage form = cgi.FieldStorage() # Get data from fields if form.getvalue(\'textcontent\'): text_content = form.getvalue(\'textcontent\') else: text_content = \"Not entered\" print \"Content-type:text/html\\r\\n\\r\\n\" print \"<html>\" print \"<head>\"; print \"<title>Text Area - Fifth CGI Program</title>\" print \"</head>\" print \"<body>\" print \"<h2> Entered Text Content is %s</h2>\" % text_content print \"</body>\"
通过CGI程序传递下拉数据
HTML下拉框代码如下:
<form action=\"/cgi-bin/dropdown.py\" method=\"post\" target=\"_blank\"> <select name=\"dropdown\"> <option value=\"Maths\" selected>Maths</option> <option value=\"Physics\">Physics</option> </select> <input type=\"submit\" value=\"Submit\"/> </form>
dropdown.py 脚本代码如下所示:
#!/usr/bin/python # -*- coding: UTF-8 -*- # Import modules for CGI handling import cgi, cgitb # Create instance of FieldStorage form = cgi.FieldStorage() # Get data from fields if form.getvalue(\'dropdown\'): subject = form.getvalue(\'dropdown\') else: subject = \"Not entered\" print \"Content-type:text/html\\r\\n\\r\\n\" print \"<html>\" print \"<head>\" print \"<title>Dropdown Box - Sixth CGI Program</title>\" print \"</head>\" print \"<body>\" print \"<h2> Selected Subject is %s</h2>\" % subject print \"</body>\" print \"</html>\"
CGI中使用Cookie
在http协议一个很大的缺点就是不作用户身份的判断,这样给编程人员带来很大的不便,
而cookie功能的出现弥补了这个缺憾。
所有cookie就是在客户访问脚本的同时,通过客户的浏览器,在客户硬盘上写入纪录数据 ,当下次客户访问脚本时取回数据信息,从而达到身份判别的功能,cookie常用在密码判断中 。
cookie的语法
http cookie的发送是通过http头部来实现的,他早于文件的传递,头部set-cookie的语法如下:
Set-cookie:name=name;expires=date;path=path;domain=domain;secure
- name=name: 需要设置cookie的值(name不能使用\”;\”和\”,\”号),有多个name值时用\”;\”分隔例如:name1=name1;name2=name2;name3=name3。
- expires=date: cookie的有效期限,格式: expires=\”Wdy,DD-Mon-YYYY HH:MM:SS\”
- path=path: 设置cookie支持的路径,如果path是一个路径,则cookie对这个目录下的所有文件及子目录生效,例如: path=\”/cgi-bin/\”,如果path是一个文件,则cookie指对这个文件生效,例如:path=\”/cgi-bin/cookie.cgi\”。
- domain=domain: 对cookie生效的域名,例如:domain=\”www.chinalb.com\”
- secure: 如果给出此标志,表示cookie只能通过SSL协议的https服务器来传递。
- cookie的接收是通过设置环境变量HTTP_COOKIE来实现的,CGI程序可以通过检索该变量获取cookie信息。
Cookie设置
Cookie的设置非常简单,cookie会在http头部单独发送。以下实例在cookie中设置了UserID 和 Password:
<pre> #!/usr/bin/python # -*- coding: UTF-8 -*- print \"Set-Cookie:UserID=XYZ;\\r\\n\" print \"Set-Cookie:Password=XYZ123;\\r\\n\" print \"Set-Cookie:Expires=Tuesday, 31-Dec-2007 23:12:40 GMT\";\\r\\n\" print \"Set-Cookie:Domain=www.w3cschool.cc;\\r\\n\" print \"Set-Cookie:Path=/perl;\\n\" print \"Content-type:text/html\\r\\n\\r\\n\" ...........Rest of the HTML Content....
以上实例使用了 Set-Cookie 头信息来设置Cookie信息,可选项中设置了Cookie的其他属性,如过期时间Expires,域名Domain,路径Path。这些信息设置在 \”Content-type:text/html\\r\\n\\r\\n\”之前。
检索Cookie信息
Cookie信息检索页非常简单,Cookie信息存储在CGI的环境变量HTTP_COOKIE中,存储格式如下:
key1=value1;key2=value2;key3=value3....
以下是一个简单的CGI检索cookie信息的程序:
#!/usr/bin/python # -*- coding: UTF-8 -*- # Import modules for CGI handling from os import environ import cgi, cgitb if environ.has_key(\'HTTP_COOKIE\'): for cookie in map(strip, split(environ[\'HTTP_COOKIE\'], \';\')): (key, value ) = split(cookie, \'=\'); if key == \"UserID\": user_id = value if key == \"Password\": password = value print \"User ID = %s\" % user_id print \"Password = %s\" % password
以上脚本输出结果如下:
User ID = XYZ Password = XYZ123
文件上传实例:
HTML设置上传文件的表单需要设置enctype 属性为multipart/form-data,代码如下所示:
<html> <body> <form enctype=\"multipart/form-data\" action=\"save_file.py\" method=\"post\"> <p>File: <input type=\"file\" name=\"filename\" /></p> <p><input type=\"submit\" value=\"Upload\" /></p> </form> </body> </html>
save_file.py脚本文件代码如下:
#!/usr/bin/python # -*- coding: UTF-8 -*- import cgi, os import cgitb; cgitb.enable() form = cgi.FieldStorage() # 获取文件名 fileitem = form[\'filename\'] # 检测文件是否上传 if fileitem.filename: # 设置文件路径 fn = os.path.basename(fileitem.filename) open(\'/tmp/\' + fn, \'wb\').write(fileitem.file.read()) message = \'The file \"\' + fn + \'\" was uploaded successfully\' else: message = \'No file was uploaded\' print \"\"\"\\ Content-Type: text/html\\n <html> <body> <p>%s</p> </body> </html> \"\"\" % (message,)
如果你使用的系统是Unix/Linux,你必须替换文件分隔符,在window下只需要使用open()语句即可:
fn = os.path.basename(fileitem.filename.replace(\"\\\\\", \"/\" ))
文件下载对话框
我们先在当前目录下创建 foo.txt 文件,用于程序的下载。
文件下载通过设置HTTP头信息来实现,功能代码如下:
#!/usr/bin/python # -*- coding: UTF-8 -*- # HTTP 头部 print \"Content-Disposition: attachment; filename=\\\"foo.txt\\\"\\r\\n\\n\"; # 打开文件 fo = open(\"foo.txt\", \"rb\") str = fo.read(); print str # 关闭文件 fo.close()