Android中使用表格布局设计注册界面,供大家参考,具体内容如下
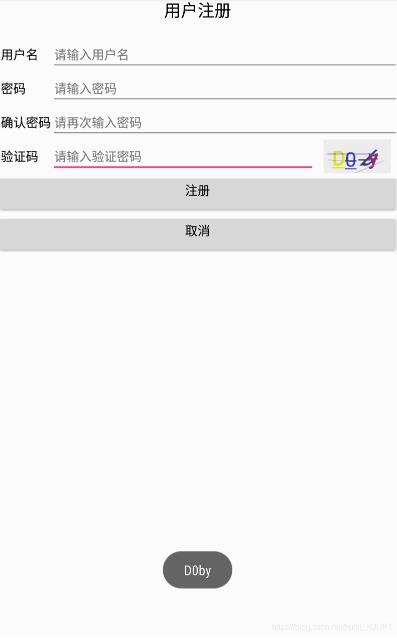
注册页面包含:用户名,密码,确认密码,验证码。验证码使用一个封装好的工具类生成的,可以直接使用。效果图如下所示。没有做事件处理,仅仅做了个简单的表格布局。
XML布局的代码如下:
<?xml version=\"1.0\" encoding=\"utf-8\"?>
<TableLayout xmlns:android=\"http://schemas.android.com/apk/res/android\"
    xmlns:tools=\"http://schemas.android.com/tools\"
    android:layout_width=\"match_parent\"
    android:layout_height=\"match_parent\"
    android:stretchColumns=\"1\"
    tools:context=\"com.example.nuist__njupt.register.MainActivity\">
<TextView
    android:id=\"@+id/register_title\"
    android:layout_height=\"wrap_content\"
    android:layout_width=\"wrap_content\"
    android:text=\"用户注册\"
    android:textSize=\"20dp\"
    android:gravity=\"center_horizontal\"
    android:textColor=\"@android:color/black\"
    android:layout_marginTop=\"5dp\"
    />
    <TableRow>
        <TextView
            android:id=\"@+id/user_name\"
            android:text=\"用户名\"
            android:textSize=\"15dp\"
            android:layout_marginLeft=\"5dp\"
            android:layout_marginTop=\"20dp\"
            android:textColor=\"@android:color/black\"
            />
        <EditText
            android:layout_width=\"match_parent\"
            android:id=\"@+id/input_name\"
            android:hint=\"请输入用户名\"
            android:textSize=\"15dp\"
            android:layout_marginTop=\"20dp\"
            android:selectAllOnFocus=\"true\"
            android:layout_span=\"2\"
            />
    </TableRow>
    <TableRow>
        <TextView
            android:id=\"@+id/user_password\"
            android:text=\"密码\"
            android:textSize=\"15dp\"
            android:layout_marginLeft=\"5dp\"
            android:textColor=\"@android:color/black\"
            />
        <EditText
            android:layout_width=\"match_parent\"
            android:id=\"@+id/input_password\"
            android:hint=\"请输入密码\"
            android:textSize=\"15dp\"
            android:inputType=\"textPassword\"
            android:layout_span=\"2\"
            />
    </TableRow>
    <TableRow>
        <TextView
            android:id=\"@+id/confirm_password\"
            android:text=\"确认密码\"
            android:textSize=\"15dp\"
            android:layout_marginLeft=\"5dp\"
            android:textColor=\"@android:color/black\"
            />
        <EditText
            android:layout_width=\"match_parent\"
            android:id=\"@+id/input_confirm\"
            android:hint=\"请再次输入密码\"
            android:textSize=\"15dp\"
            android:inputType=\"textPassword\"
            android:layout_span=\"2\" />
    </TableRow>
    <TableRow>
        <TextView
            android:id=\"@+id/test_password\"
            android:text=\"验证码\"
            android:textSize=\"15dp\"
            android:layout_marginLeft=\"5dp\"
            android:textColor=\"@android:color/black\"
            />
        <EditText
            android:layout_width=\"match_parent\"
            android:id=\"@+id/input_test\"
            android:hint=\"请输入验证密码\"
            android:textSize=\"15dp\"
            android:layout_toLeftOf =\"@+id/image\"
            />
        <ImageView
            android:id=\"@+id/image\"
            android:layout_width=\"100dp\"
            android:layout_height=\"40dp\"/>
    </TableRow>
    <Button
        android:id=\"@+id/register\"
        android:layout_height=\"wrap_content\"
        android:layout_width=\"match_parent\"
        android:text=\"注册\"
        android:textColor=\"@android:color/black\"
        android:textSize=\"15dp\"
        android:gravity=\"center_horizontal\"
        />
    <Button
        android:id=\"@+id/cancel\"
        android:layout_height=\"wrap_content\"
        android:layout_width=\"match_parent\"
        android:text=\"取消\"
        android:textColor=\"@android:color/black\"
        android:textSize=\"15dp\"
        android:gravity=\"center_horizontal\"
        />

</TableLayout>
java代码如下:
public class MainActivity extends AppCompatActivity {

    private Bitmap bitmap;
    private String code;

    @Override
    protected void onCreate(Bundle savedInstanceState) {
        super.onCreate(savedInstanceState);
        setContentView(R.layout.activity_main);

        final ImageView image = (ImageView) findViewById(R.id.image); //获取需要展示图片验证码的ImageView

        bitmap = CodeUtils.getInstance().createBitmap(); //获取工具类生成的图片验证码对象

        code = CodeUtils.getInstance().getCode();  //获取当前图片验证码的对应内容用于校验

        image.setImageBitmap(bitmap);
        image.setOnClickListener(new View.OnClickListener() {
            @Override
            public void onClick(View view) {
                bitmap = CodeUtils.getInstance().createBitmap();
                code = CodeUtils.getInstance().getCode();
                image.setImageBitmap(bitmap);
                Toast.makeText(MainActivity.this, code, Toast.LENGTH_SHORT).show(); //图片验证码内容提示
            }
        });
    }
}
工具类CodeUtils的代码如下:
/**
 * Created by nuist__NJUPT on 2021/4/16.
 */
public class CodeUtils {

    //随机码集
    private static final char[] CHARS = {
            \'0\', \'1\', \'2\', \'3\', \'4\', \'5\', \'6\', \'7\', \'8\', \'9\',
            \'a\', \'b\', \'c\', \'d\', \'e\', \'f\', \'g\', \'h\', \'i\', \'j\', \'k\', \'l\', \'m\',
            \'n\', \'o\', \'p\', \'q\', \'r\', \'s\', \'t\', \'u\', \'v\', \'w\', \'x\', \'y\', \'z\',
            \'A\', \'B\', \'C\', \'D\', \'E\', \'F\', \'G\', \'H\', \'I\', \'J\', \'K\', \'L\', \'M\',
            \'N\', \'O\', \'P\', \'Q\', \'R\', \'S\', \'T\', \'U\', \'V\', \'W\', \'X\', \'Y\', \'Z\'
    };

    private static CodeUtils mCodeUtils;
    private int mPaddingLeft, mPaddingTop;
    private StringBuilder mBuilder = new StringBuilder();
    private Random mRandom = new Random();

    //Default Settings
    private static final int DEFAULT_CODE_LENGTH = 4;//验证码的长度  这里是4位
    private static final int DEFAULT_FONT_SIZE = 60;//字体大小
    private static final int DEFAULT_LINE_NUMBER = 3;//多少条干扰线
    private static final int BASE_PADDING_LEFT = 20; //左边距
    private static final int RANGE_PADDING_LEFT = 30;//左边距范围值
    private static final int BASE_PADDING_TOP = 70;//上边距
    private static final int RANGE_PADDING_TOP = 15;//上边距范围值
    private static final int DEFAULT_WIDTH = 200;//默认宽度.图片的总宽
    private static final int DEFAULT_HEIGHT = 100;//默认高度.图片的总高
    private static final int DEFAULT_COLOR = Color.rgb(0xee, 0xee, 0xee);//默认背景颜色值

    private String code;

    public static CodeUtils getInstance() {
        if (mCodeUtils == null) {
            mCodeUtils = new CodeUtils();
        }
        return mCodeUtils;
    }

    //生成验证码图片
    public Bitmap createBitmap() {
        mPaddingLeft = 0; //每次生成验证码图片时初始化
        mPaddingTop = 0;

        Bitmap bitmap = Bitmap.createBitmap(DEFAULT_WIDTH, DEFAULT_HEIGHT, Bitmap.Config.ARGB_8888);
        Canvas canvas = new Canvas(bitmap);
        code = createCode();
        canvas.drawARGB(0, 0, 0, 0);
        canvas.drawColor(DEFAULT_COLOR);
        Paint paint = new Paint();
        paint.setTextSize(DEFAULT_FONT_SIZE);

        for (int i = 0; i < code.length(); i++) {
            randomTextStyle(paint);
            randomPadding();
            canvas.drawText(code.charAt(i) + \"\", mPaddingLeft, mPaddingTop, paint);
        }

        //干扰线
        for (int i = 0; i < DEFAULT_LINE_NUMBER; i++) {
            drawLine(canvas, paint);
        }

        canvas.save();//保存
        canvas.restore();
        return bitmap;
    }

    /**
     * 得到图片中的验证码字符串
     *
     * @return
     */
    public String getCode() {
        return code;
    }

    //生成验证码
    public String createCode() {
        mBuilder.delete(0, mBuilder.length()); //使用之前首先清空内容
        for (int i = 0; i < DEFAULT_CODE_LENGTH; i++) {
            mBuilder.append(CHARS[mRandom.nextInt(CHARS.length)]);
        }
        return mBuilder.toString();
    }

    //生成干扰线
    private void drawLine(Canvas canvas, Paint paint) {
        int color = randomColor();
        int startX = mRandom.nextInt(DEFAULT_WIDTH);
        int startY = mRandom.nextInt(DEFAULT_HEIGHT);
        int stopX = mRandom.nextInt(DEFAULT_WIDTH);
        int stopY = mRandom.nextInt(DEFAULT_HEIGHT);
        paint.setStrokeWidth(1);
        paint.setColor(color);
        canvas.drawLine(startX, startY, stopX, stopY, paint);
    }

    //随机颜色
    private int randomColor() {
        mBuilder.delete(0, mBuilder.length()); //使用之前首先清空内容
        String haxString;
        for (int i = 0; i < 3; i++) {
            haxString = Integer.toHexString(mRandom.nextInt(0xEE));
            if (haxString.length() == 1) {
                haxString = \"0\" + haxString;
            }
            mBuilder.append(haxString);
        }
        return Color.parseColor(\"#\" + mBuilder.toString());
    }

    //随机文本样式
    private void randomTextStyle(Paint paint) {
        int color = randomColor();
        paint.setColor(color);
        paint.setFakeBoldText(mRandom.nextBoolean());  //true为粗体,false为非粗体
        float skewX = mRandom.nextInt(11) / 10;
        skewX = mRandom.nextBoolean() ? skewX : -skewX;
        paint.setTextSkewX(skewX); //float类型参数,负数表示右斜,整数左斜
        paint.setUnderlineText(mRandom.nextBoolean()); //true为下划线,false为非下划线
        paint.setStrikeThruText(mRandom.nextBoolean()); //true为删除线,false为非删除线
    }

    //随机间距
    private void randomPadding() {
        mPaddingLeft += BASE_PADDING_LEFT + mRandom.nextInt(RANGE_PADDING_LEFT);
        mPaddingTop = BASE_PADDING_TOP + mRandom.nextInt(RANGE_PADDING_TOP);
    }
}
以上就是本文的全部内容,希望对大家的学习有所帮助,也希望大家多多支持自学编程网。